
 Drone Services
 Access Equipment
 Breaking & Drilling
 Cleaning Equipment
 Drying & Heating
 General Site Tools
Cleaning Equipment, Equipment Hire Guides
How to Strip, Seal and Polish a Floor
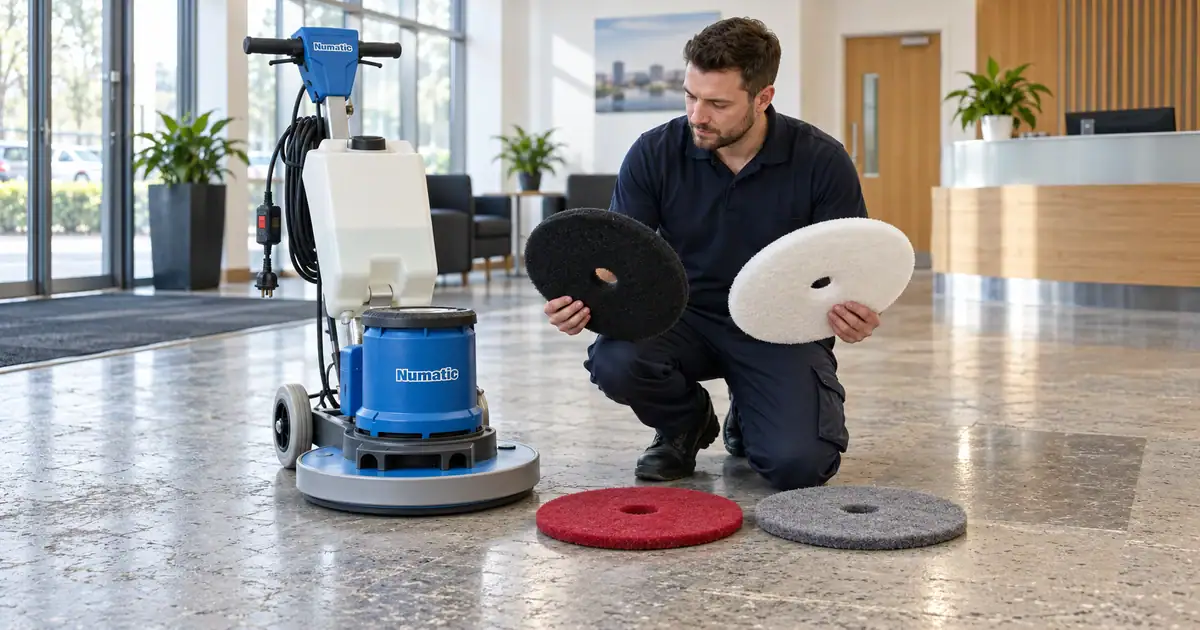
The floor is not dirty. The finish is worn out.
There is a point where mopping stops working and even a scrubber dryer stops helping, because what you are looking at is not soil — it is a polish layer that has gone grey, scuffed and patchy. That floor does not need cleaning. It needs stripping back and re-sealing, and that is a job only a rotary machine can do.
How do you strip and seal a floor?
You dissolve the old polish with a stripping solution, agitate it with a rotary machine and a black pad, pick the slurry up with a wet vacuum, rinse the floor until it is neutral and completely dry, then lay new sealer or polish in thin coats and let each one cure. The rotary machine is doing two different jobs in that sequence — the heavy agitation at the start, and, once the floor is sealed, the buffing that keeps it looking new between strips.
The reason people get stuck is equipment. A mop cannot agitate hard enough to break a polish layer, and a scrubber dryer — which is the right machine for routine cleaning — is not built for stripping: its squeegee and recovery system are designed for dilute cleaning solution, not thick polish slurry. For this job you want a rotary floor machine and a wet and dry vacuum, plus stripper, sealer and the right pads.
Why a scrubber dryer cannot do this job
This surprises people, because a scrubber dryer is the more expensive and more modern machine. But the two are built for different things, and stripping is the clearest example of where the older, simpler machine is the only one that works.
A rotary drives a single 450mm disc under the machine’s own weight — 32 kg on our unit. That concentrated pressure is what breaks a polish layer. A scrubber dryer’s brush is designed to sweep soil off a floor, not to abrade a coating.
Stripping produces a thick, alkaline slurry of dissolved polish. That belongs in a wet vacuum with a large opening and a simple tank, not through the squeegee, hose and recovery system of a scrubber dryer, where it can set as it dries.
A rotary takes interchangeable pads from aggressive black through to soft white. The same machine strips, scrubs, cleans and polishes depending on what you clip underneath it. That range is the reason it is still in every cleaning contractor’s van.
450mm and manoeuvrable, it works around fixtures, in small rooms and along edges where a walk-behind scrubber dryer simply cannot reach.
| Job | Rotary floor machine | Scrubber dryer |
|---|---|---|
| Routine cleaning of a large floor | Works, but slower and leaves the floor wet | The right tool — scrubs and dries in one pass |
| Stripping old polish or sealer | The correct machine | Not designed for it |
| Applying and buffing polish | The correct machine | Cannot do it at all |
| Deep-scrubbing textured or safety flooring | Strong — pressure gets into the profile | Limited — the squeegee cannot seal on deep texture |
| Small rooms, edges and around fixtures | Good — compact and manoeuvrable | Awkward |
| Cleaning a carpet | No — our rotary pads and brushes are for hard floors | No — a carpet needs an extractor |
| Leaving the floor walkable straight away | No — you need a wet vacuum alongside | Yes — that is its whole design |
| Cleaning 2,000m² of warehouse | Wrong tool | The right tool |
So these are complementary machines, not rivals. If what you need is routine cleaning of a big hard floor, a scrubber dryer is what you want and this guide is not your job. If your floor has a finish on it that has failed, read on.
Does your floor actually need stripping?
Stripping is a day of work and it removes a protective layer, so it is worth being sure. Most tired-looking floors fall into one of these three, and only one of them needs a full strip.
| What you are seeing | What it probably is | What it needs |
|---|---|---|
| Dull, but even, and it cleans up wet | Soil and residue sitting on top of an intact finish | A deep clean. Scrub with a red or grey pad and a neutral cleaner, or run a scrubber dryer over it |
| Grey, patchy, darker in the traffic lanes, scuffs that will not mop out | Polish layer worn through in places and dirt now trapped in the remaining layers | A full strip and re-seal — this guide |
| Bare, porous, staining easily, no shine anywhere | The finish is gone completely, or there never was one | Clean, neutralise, then seal from bare. No stripping needed — there is nothing left to strip |
Five signs it is a strip, not a clean:
A quick test that settles it: put a little stripper solution on a small hidden patch, leave it the time the label says, and work it with a white pad by hand. If a milky film lifts and the floor underneath is noticeably brighter, there is polish on there and a strip will transform it. If nothing lifts, you are looking at a bare or worn-through floor and the job is clean, neutralise and seal.
What the machine actually is
A rotary floor machine is deliberately simple: a motor, a gearbox, a single drive disc and a long handle. Ours is a Numatic BMD 1000 series with a 450mm disc, a 1,000W motor and a working speed of 150 rpm, running on 230V with an RCD supplied.
| Spec | Figure | What it means for you |
|---|---|---|
| Disc size | 450mm | Covers ground reasonably fast but still turns in a domestic hallway or a small shop floor |
| Speed | 150 rpm | Standard speed. This is the correct range for scrubbing, stripping and spray cleaning |
| Motor | 1,000W | Enough torque to keep the pad turning under load when it bites into a polish layer |
| Weight | 32 kg | The weight is the point — it is what presses the pad into the floor. It also means two people or a trolley for stairs |
| Power | 230V, 13A, RCD included | Plugs into a normal socket. The RCD comes with the machine |
| Supplied with | Pad holder | Pads and brushes are optional extras — tell us what the job is and we will confirm what you need |
| Not supplied | Stripper, sealer, cleaning chemical | You source the chemicals to suit your floor type |
| Solution tank | On the machine | You fill it — warm water and a neutral cleaner for scrubbing, diluted as the label says |
One honest limit on the polishing side. At 150 rpm this is a standard-speed rotary, which is the right speed for scrubbing, stripping and spray-buffing back to a clean satin finish. It is not a high-speed burnisher — those run at well over a thousand rpm and are what produce a mirror gloss on a supermarket floor. If a deep wet-look shine is what you are picturing, that is a different machine and you should tell us before you book.
The pads and brushes we hire
The pad does the work; the machine just turns it. Getting this wrong is the single most common reason a strip fails or a floor gets damaged. Below is the range we actually hire with the rotary machine, running from most aggressive to least. If you source pads elsewhere, check the chart on the box — colour conventions vary between brands, so the same colour will not always behave the way ours does.
| Pad or brush | Use when | Works best on | Check first |
|---|---|---|---|
| Black padHeavy-duty scrubbing | Heavier scrubbing, and stripping old polish | Built-up grime, scuffs and tougher surface dirt on suitable hard floors | The most aggressive option we supply. It can be too aggressive for delicate, polished, wooden or unknown floors |
| Red padBuffing / light cleaning | Light cleaning, buffing or a routine refresh | Light marks, traffic lanes and sealed floors in suitable condition | Not for heavy stripping. Confirm the floor is suitable for rotary buffing |
| Grey padMaintenance / gentle cleaning | Gentler maintenance cleaning | Light soil and regular upkeep where a softer approach suits | Still test first, and avoid it if the floor type or finish is unknown |
| White padPolishing / finishing | A final pass, polishing or finishing | Clean floors that need a light finishing pass | Not for removing heavy dirt. Use only where the floor is suitable |
| Deep cleaning scrubbing brushDeeper agitation | More agitation than a pad can give | Textured floors, grout lines, uneven surfaces and deeper soil | May be too aggressive for some finishes. Confirm surface suitability |
| Soft surface cleaning brushGentler brushing | Gentler brushing is needed | Sensitive or textured surfaces where a softer brush may suit | Still test first. Not every soft surface is suitable for rotary cleaning |
This table is general information, not a recommendation. Pad and brush suitability varies with the floor type, finish and condition, and the result depends on how the machine is used. Choosing and testing the right option stays with the person doing the work.
The rule of thumb: start with the least aggressive pad that might work, and only step up if it does not. You can always go more aggressive. You cannot put a floor’s surface back.
What you need to hire, and what you need to buy
A strip and seal is a two-machine job. The most common mistake is booking the rotary on its own and then discovering there is no way to get the slurry off the floor.
Hire these two together — the second one is not optional on a strip.
All prices exclude VAT. A refundable security deposit is taken on every hire and returned once the equipment comes back in the condition it went out.
And the consumables, which you source to suit your floor:
Pads and brushes are an optional extra on the hire rather than something that arrives automatically, so tell us what the floor is and what you are trying to do and we will confirm what to send. If you hire regularly, how tool hire trade accounts work covers the account side.
The method, step by step
Give yourself a full day for a single room and do not start at four in the afternoon. The curing time at the end is not negotiable and it is what ruins rushed jobs.
Step 1 — Clear the room and protect the edges
Everything out. Then sweep or vacuum the whole floor properly — grit left on the surface will be dragged around under a stripping pad and can scratch the floor you are about to seal.
Tape and sheet the skirtings, door frames and any fitted units. Stripper splashes, and it will mark paint and timber. Put wet floor signs at every entrance, and if anyone else is in the building, make sure they know the room is out of use for the day.
Step 2 — Apply the stripper and let it dwell
Mix the stripping solution to the dilution on the label — stronger is not better and can damage the floor. Lay it on generously with a mop across an area you can work in one go, rather than the whole room at once. A section of about ten square metres is manageable.
Then wait. The dwell time on the label is doing the chemical work; the machine is only there to agitate what the stripper has already softened. Do not let it dry out — if it starts to, re-wet it.
Step 3 — Agitate with the rotary and a black pad
Fit a black stripping pad, set the handle to a comfortable height, and start the machine with the pad flat on the floor. Work it slowly side to side across the wetted section, overlapping each pass. The machine will want to travel — raising the handle slightly sends it one way, lowering it sends it the other, and that is how you steer.
You will see the finish lift as a milky slurry. Go over stubborn patches again rather than pressing harder. Flip or change the pad when it loads up; a clogged pad stops cutting and just smears.
Step 4 — Pick the slurry up before it dries
This is the step that decides whether the job looks good. Get the wet vacuum over the section straight away and take up all of it. Slurry left to dry re-deposits the polish you just dissolved, in a thin grey film that you will then have to strip again.
Work section by section: strip, agitate, vacuum, move on. Do not strip the whole room and then start vacuuming.
Step 5 — Rinse until the floor is neutral
Rinse with clean water, and use a neutraliser if the stripper manufacturer says to. Pick the rinse water up with the wet vacuum too. Then do it again. Two rinses is normal and it is worth it, because any stripper residue left on the floor will stop the new sealer bonding and the finish will lift in weeks.
Check as you go: the floor should feel squeaky rather than slippery, and the rinse water should be coming up clear.
Step 6 — Dry completely, then seal in thin coats
The floor must be bone dry before the first coat. Air movers help here and cut hours off the wait. Any trapped moisture will cloud the sealer.
Lay the sealer thin and even with a clean flat mop or applicator, working in one direction and keeping a wet edge. Thin coats that cure properly beat thick coats every time — a heavy coat stays soft, marks easily and can look milky. Let each coat cure for the time on the label, which is usually longer than you want it to be, then apply the next. Two to four coats is typical depending on the product and the traffic.
Keep everyone off it. Foot traffic on a curing coat is the most common way a good strip ends up looking bad.
Once it is cured and back in service, the maintenance job is spray buffing: a light mist of maintenance product and a red pad on the same machine, which cleans and brings the shine back up without touching the sealer. Done regularly, that is what pushes the next full strip years down the line instead of months.
Which floors can be stripped and sealed — and which must not be
The wrong chemical on the wrong floor is expensive, and it is not always obvious. When in doubt, test a hidden patch first and check the floor manufacturer’s guidance.
| Floor | Strip and seal? | Notes |
|---|---|---|
| Vinyl sheet and vinyl tile | Yes — the classic case | What most polish and stripper products are formulated for |
| Safety flooring | Usually not sealed | The grit in the surface is the slip resistance. Deep-scrub it with the deep cleaning scrubbing brush, do not seal over it unless the manufacturer says to |
| Linoleum | With care | True lino is alkali-sensitive. Use a product approved for linoleum and never a strong general stripper |
| Sealed concrete | Yes | Common in workshops, showrooms and back-of-house areas |
| Terrazzo and polished stone | Specialist | Can be sealed, but stripping and polishing stone is a different trade with different pads and chemicals. Get advice first |
| Ceramic and porcelain tile | Rarely needed | Usually a deep scrub of the tile and grout rather than a strip. A brush rather than a pad gets into the joints |
| Sealed timber and laminate | No | Water and strippers do not belong on a wood floor. Refinishing is a sanding job — see how to sand a wooden floor |
| Sports hall and sprung floors | Follow the manufacturer only | These have specified maintenance regimes. Deviating from them can affect the playing surface and any warranty |
| Rubber flooring | Check first | Many rubber floors should never be sealed, and some strippers attack the surface |
| Carpet | Not applicable | Different job. Our rotary pads and brushes are for hard floors; for carpet use our commercial carpet extractor |
How long it takes and what it costs
The honest version. Stripping is slow because of dwell times and curing times, not because the machine is slow.
| Area | Strip, vacuum and rinse | Sealing and curing | Sensible hire |
|---|---|---|---|
| A small room or hallway, up to 20m² | 2–3 hours | Coats through the rest of the day | 1 day |
| A shop floor or office, 50–100m² | Most of a day | Overnight curing before use | 2 days |
| A larger commercial floor, 200m²+ | A full day or more | A second day for coats | 3–7 days |
| Deep scrub only, no stripping | Roughly half the time | None — nothing to cure | 1 day |
| Spray buffing an already sealed floor | An hour or two | None | 1 day |
| Hire period | Rotary floor machine | Wet and dry vacuum | Both together |
|---|---|---|---|
| 1 day | £44.99 | £24.99 | £69.98 |
| 2 days | £64.99 | £32.99 | £97.98 |
| 3–7 days | £84.99 | £44.99 | £129.98 |
| 8 days and over | £10.99/day | £7.00/day | £17.99/day |
| Delivery | Same-day and next-day across London | Same booking | From our Greenford UB6 depot — delivery and collection areas |
| Collection | Free click & collect | Free click & collect | The rotary is 32 kg — bring a second pair of hands |
Set that against the alternative. A contractor stripping and sealing a floor for you is a skilled day rate plus materials. Hiring the two machines for a week costs £129.98 + VAT and you buy the chemicals. For a landlord turning round a flat, a shop doing it out of hours, or a facilities team with several floors to get through, the arithmetic is usually straightforward. If you want the wider picture on machine hire costs, what floor cleaning machines cost to hire covers the range.
Mistakes that ruin a strip and seal
The big one. Dissolved polish that dries back onto the floor leaves a grey film and you are stripping again. Work in sections and vacuum each one before it dries.
Stripper residue stops the new sealer bonding. Two rinses, with a neutraliser if the label says so, and check the water is coming up clear.
Trapped moisture clouds the finish. Bone dry before the first coat, and an air mover is cheaper than doing it twice.
A heavy coat stays soft, scuffs immediately and can go milky. Thin coats, full curing time between them, every time.
The most common way a good job ends up looking bad. Respect the curing time on the label, and keep the room closed.
Black is the most aggressive pad we hire. If the finish is intact and the floor is just dirty, a red or grey pad and a neutral cleaner is the whole job.
Safety flooring, lino, rubber and sports floors all have rules. Check the floor manufacturer’s guidance before the chemical comes out of the bottle.
Sweep and vacuum properly. Grit under a spinning pad scratches the surface you are about to seal.
Frequently asked questions
How do you strip and seal a floor?
Clear and sweep the room, apply stripping solution and let it dwell for the time on the label, agitate it with a rotary floor machine and a black pad, vacuum the slurry up with a wet vacuum before it dries, rinse until the floor is neutral and the water comes up clear, dry it completely, then lay new sealer in thin coats with full curing time between each. Work in sections of around ten square metres rather than doing the whole room one stage at a time.
Can you strip a floor with a scrubber dryer?
No. A scrubber dryer is the right machine for routine cleaning, but it is not built for stripping. Its brush is designed to sweep soil off the surface rather than abrade a coating, and thick polish slurry does not belong in a squeegee and recovery system designed for dilute cleaning solution. Stripping needs the concentrated downward pressure of a rotary machine and a wet vacuum to lift the slurry.
What pad do you use to strip a floor?
The black pad, used with a stripping solution. It is the most aggressive pad we hire with the rotary machine and it is the one that takes old polish off. The rest of our range works the other way: the red and grey pads are for buffing, light cleaning and maintenance, and the white pad is for the final polishing pass. We also hire a deep cleaning scrubbing brush for textured floors and grout lines, and a soft surface cleaning brush for more sensitive surfaces. Colour conventions vary between manufacturers, so if you source pads elsewhere, check the chart on the packaging rather than assuming the colour means the same thing.
How long does it take to strip and seal a floor?
A small room or hallway of up to about 20m² is a full day once you allow for dwell times, two rinses, drying and coats. A shop floor or office of 50 to 100m² is realistically two days with overnight curing before anyone walks on it. The machine work is the quick part — what sets the timeline is the chemical dwell time, getting the floor bone dry and letting each coat cure.
How many coats of floor sealer do you need?
Typically two to four, depending on the product and how much traffic the floor takes. Thin, even coats with the full curing time between them will always outperform fewer thick ones: a heavy coat stays soft, scuffs straight away and can dry milky. Follow the coverage and curing figures on the product you are using rather than a general rule.
Do I need a wet vacuum as well as the rotary machine?
For a strip, yes — it is not optional. The stripping process dissolves the old polish into a slurry, and if that slurry dries back onto the floor it leaves a grey film and you have to strip again. A wet vacuum takes it off the floor while it is still wet. For a straight deep scrub with no stripping you can manage with a mop and bucket, though a vacuum still gives a better finish.
Can you strip and seal safety flooring?
Usually you should not seal it. The grit embedded in safety flooring is what gives it its slip resistance, and a coat of polish over the top can reduce that. What safety flooring normally needs is a deep scrub with the deep cleaning scrubbing brush to get the soil out of the profile, not a strip and seal. Check the floor manufacturer’s guidance before doing anything else.
Will a rotary machine give my floor a high-gloss shine?
It will bring a sealed floor back to a clean satin finish, which is what most floors are meant to look like. A mirror, wet-look gloss is produced by a high-speed burnisher running at well over a thousand rpm, and our machine is a standard-speed rotary at 150 rpm — the correct speed for scrubbing, stripping and spray buffing. If a high gloss is what you are after, tell us before booking.
What does it cost to hire the equipment in London?
The rotary floor machine is £44.99 + VAT for one day, £64.99 + VAT for two days and £84.99 + VAT for three to seven days, then £10.99 per day + VAT. The wet and dry vacuum is £24.99, £32.99 and £44.99 + VAT across the same periods, then £7.00 per day. Both together for up to a week is £129.98 + VAT. A refundable security deposit is taken on every hire, and chemicals are not included.
Are pads and chemicals included in the hire?
The machine comes with a pad holder and an RCD. Pads and brushes are an optional extra rather than automatic, and stripper, sealer and cleaning chemicals are not included — you source those to suit your floor type. Tell us what the floor is and what you are trying to achieve when you book, and we will confirm what pads to send with it.
Related guides
More floor and cleaning guides:
Tell us the floor and we will tell you the pads
Send us three things: what the floor is made of, roughly how big it is, and whether you think it needs a deep scrub or a full strip. We will confirm which pads to send with the machine, whether you need the wet vacuum alongside, and how many days to book. If your floor should not be stripped, we will say so.
Specifications, sources and limits: machine figures are the manufacturer’s published values for the Numatic BMD 1000 series — 450mm brush, 1,000W motor, 150 rpm, 32 kg — supplied on 230V with an RCD. The pad and brush range listed is the range we hire with the rotary machine, taken from our own product page. Colour conventions vary between manufacturers, so if you source pads elsewhere, check the chart on the packaging. Stripping and sealing products differ widely in dilution, dwell time, coverage and curing time, and the correct figures are those on the product you are using. Floor suitability, including whether a floor should be sealed at all, is determined by the floor manufacturer’s own maintenance guidance — this is particularly important for safety flooring, linoleum, rubber, sports floors and stone. Test a hidden area before treating a whole floor. Floor strippers are strongly alkaline: wear gloves and eye protection, ventilate the area and follow the product safety data sheet. This guide is general information and does not replace the floor or product manufacturer’s instructions.

 Drone Survey & Mapping
 Drone Inspections